
I know that my continual demonstration of clues I have found in Bessler's work seem to be centred on the existence of hidden pentagrams and a few alphanumeric clues. The usual question is, so what? Where are the clues which will lead to constructing a replica of Bessler's wheel? My point in advertising these seemingly irrelevant pieces of coding is to show that Bessler wanted us to find them and provided dozens and dozens of them in various forms so that we would eventually get the message and realise that there must be more to find and that it would eventually lead to the discovery of more graphic information and subsequently his wheel.
Many of us are convinced that Bessler's claims were genuine, even though we don't know how he did it. Assuming he was genuine then, why would he waste his time in creating so many ingenious clues in all of his publications, extolling the virtues of his wonderful machine, and
include illustrations that do nothing to tell us about the machines. Why
bother? Because the coded clues are intended to provide
information or at least point to where that information can be found The number 55 rears .its head with monotonous regularity and you'd have to be blind not to see where it's pointing to - his Apologia Poetica, Chapter 55. http://www.orffyreus.net/html/chapter_55.html shows everything I've discovered about chpater 55 and it is obviously full of encoded material and one day someone will work out how to decipher it. I confess it has beaten me so far although I understand that there are others working on it who are optimistic that they are making some headway.
So back to the numbering clues in the Das Tri illustrations. Johann Bessler included an illustration showing the perpetual motion machine at Schloss Weissenstein. It was connected to an archimedes pump and apparently demonstrated its power to pump water. See the illustration below.
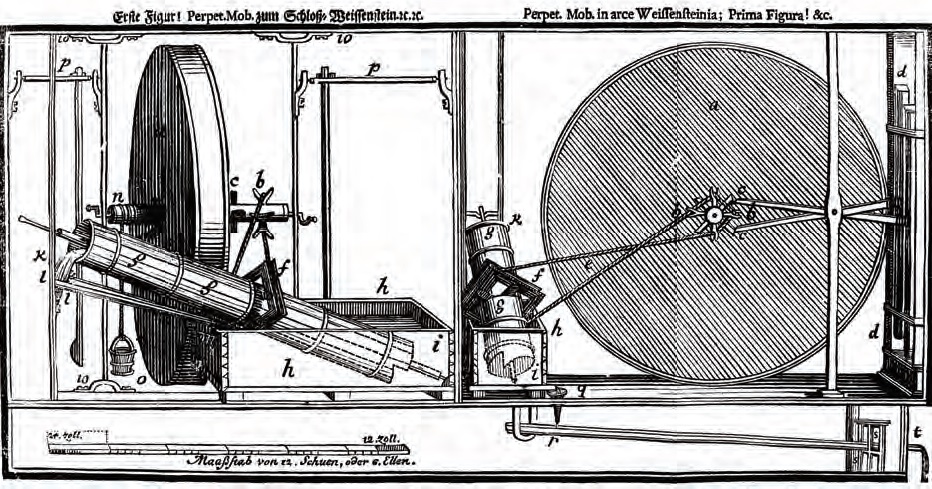
Like the previous one this drawing is in two parts. It uses letters from the alphabet rather than numbers this time to label the different parts. The letters run from 'A' to 'T', in lower case. He has omitted the letter 'J' because as we know, it is used as an alternative to the letter, 'i' in the German 24 letter alphabet, which is present. Curiously the letter 'W' appears twice at the top of left side drawing and once at the bottom. I say curiously because the letters 'U' and 'V' have been omitted and yet they are alternatives to each other and one might have expected to find one of them present seeing as their following letter, 'W' is included.
But there is more. The itemised list that accompanies this illustration includes all the lower case letters with descriptions of the parts, but then uses the number ten in place of the apparent 'W' as seen in the drawing itself. Furthermore closer scrutiny of the hand-drawn 'W' shows that it could also be read as the number ten. But this makes no sense since the rest are labelled alphabetically.

In confirmation of this see the example from the list below. The letter 's' then 't' is followed by the number '10'.

Bessler's frequent use of alpha-numerics demands that we check out the possible use of them in this illustration. Clearly
we are meant to convert all the letters to numbers.
Adding up the subsequent numbers gives a total of 355, but this seems
insignificant, until you realise that Bessler has again omitted one of the
number 5s. The number 5 identifies the
rope in the right drawing but there is no such label attached to the rope in
the left drawing. From previous analyses
we know that this is a typical Bessler method of encoding information within a
drawing. Adding the missing number 5 to
the total brings it up to 360.
The total of numbers comes to 40 with the inclusion of the
missing number 5 and as we have done before we divide 360 by 40 to give us
90. A total of 90 again points to 18 times 5. Once again we see
the two main numbers associated with the pentagram.
As we saw in the previous drawing, the illustrations are
in two halves. Looking at the bottom of
the right drawing there seem to be an unnecessary addition of extra letters,
for instance there are two completely superfluous S’s and in fact the bottom of
this right side drawing seems almost to have been added as an afterthought designed to
boost the total to 360. See below.


Adding up the numbers in the right side drawing but excluding those extra ones underneath gives us 72, another key number in the pentagram. The numbers in the left drawing total either 190 or 195
depending whether you include the missing number 5, but there are 18 numbers in total. The total number of letters used throughout is 20 if you count the 'W' as a letter and not a number. 360 divided by 20 equals 18. Bessler achived two things in this illustration, he demonstrated the presence of the number 72 again in the right side drawing excluding the numbers underneath - and he then obtained another meaningful number by adding both sides and including the extra numbers under the right side to get 360. Of course 360 divided by 72 equals 5.
There are other clues buried in this illustration. For instance in the picture below one can see
two lines drawn in red, separated by a red vertical line forming angles of 72 degrees and the other, in blue, which is 54
degrees to the same vertical line,
each seem to suggest another pentagram.

JC


It's quite obvious to all that Bessler was obsessed with numbers and their numerological significance. I think his mixing of the letter "W" with the number 10 is more than just that "W" can be written as two "V's" that, as Roman numerals, add up to 10. From inspecting the lower case "w" at the top leftmost part of the Kassel wheel illustration in DT, it seems that Bessler must have noticed that, as drawn, the letter actually looks like a 10! There is more significance to the letter "W", however. "W" is the 23rd letter of a 26 letter alphabet and 23 can be written as 2 + 3 which, of course, equals 5. If one considers "W" to equal 5 x 5 then it equals 25 and that number's digits sum to 7 which is considered a lucky number in numerology. Most importantly, 25 squared is 625 and this is, according to my research into the various coding systems he used, "the" most important parameter value incorporated into his wheels for reasons which I can not go into at this time.
ReplyDeleteI'm not surprised at any of the pentagonal angles that you keep finding in his illustrations, John, but many artists aside from Bessler embedded geometrical figures into their artwork. However, I do agree that Bessler included them for another purpose with more numerological significance. Each regular pentagon can be subdivided up into five isosceles triangles whose three interior angles are: 72, 54, and 54 degrees. Coincidentally, both the Merseberg and Kassel wheels have radii that are exactly 72 inches! So, we see from this that, occasionally, Bessler uses angles to represent linear dimensions. If we subtract 54 from 72 we get 18 which, again coincidentally, is the radius of his 3 foot or 36 inch diameter prototype wheel or 18 inches. 54 / 72 = 0.75 and the digits in 0.75 sum to 12 which was the diameters of his largest wheels in feet.
There is another, non-numerological detail to the DT illustrations of the Kassel wheel that many seem to miss. Note that the vertical support for this massive wheel were actually attached to bridge-like metal pieces in such a way that one could plainly see that the wooden supports did not make contact with the floor or ceiling of the room. This was obviously intended to show the reader that there were no hidden drive belts or rods inside of hollowed out supports that were applying forces to the axle pivots to turn the wheel.
Update. My model testing has been derailed a bit by the holiday festivities. However, I have finally found what I consider the "mother lode" of alphanumeric codes in the second DT portrait. Interestingly, it involves a single word in the first line of text under the portrait. The word is "Zeugs". I can't explain all of the critrically important parameters that are associated with this one word, but they are, I'm convinced absolutely necessary to any reverse engineer who seeks to successfully reverse engineer Bessler's wheels. Note that the word contains the letters "Z" and "g" and these two letters only occur once in the two portrait captions. I don't believe it was just chance. "Z" is the last letter of a 26 letter alphabet and its use in this word was, imo, Bessler's way of saying that the last clues the reverse engineer needs will be found by decoding this word (and I now have most of them!). And the letter "g"? It is the 7th letter of the alphabet and in numerology 7 is considered a lucky number. But "g" is also the first letter of the word "Gera" which is the name of the town that Bessler first constructed a small 3 foot diameter imbalanced pm wheel prototype that actually worked. That happened in early 1712 and a few months later he held his first public demonstration of a larger edition in his home there. So we have the strong suggestion by the choice of the word "Zeugs" that it provides the last clues one needs to find the success that Bessler did in Gera almost three centuries ago. I'll leave the English translation of "Zeugs" to others.
ReplyDeleteJohann Bessler probably used the letter W as "10", because in German the letter X is very rare. Look at the verses in "Das 1719. Jahr" : at each verse, the sum of the letter values I / J (1), V (5), W (10), L (50), C (100), D (500) and M (1000) always makes 1719.
ReplyDeleteI put this book in my dropbox here :
https://www.dropbox.com/s/k3j6ibyi4n51l3t/Year%201719.pdf?dl=0
Thanks for that Michel. I have a copy of that document and another one from another year, all containing similar chronograms. But I had forgotten that I/J stood for #1. My first reaction was that there were letter 'a's in the above drawing and therefore two letters representing #1, but then I realised that they are all lower case, except for the 'W'.
DeleteOne thing i did notice which I had missed previously were the letters under the name ORFFYREUS. I was going to post a blog about my interpretation of the so-called logo on my page 143, or Bessler page 136. in Das triumphans.
Under the DT version it reads D.M.M.P.M. but in your book in dropbox it reads D.M.M.P.M.Z.W.S.
Curious. I always imagine it stands for Doctor of Medicine, Mathemetics and Perpetual Motion. I have no evidence that that is what it stands for but now we have these additional letters, the puzzle deepens.
JC
John, on top of the above drawing, we read : "Erste Figur | Perpetuum Mobile zum Schloss Weissenstein".
DeleteIs "Z. W. S." possibly meaning : "zum Weissenstein Schloss" (at Weissenstein Castle) ?
So, "D.M.M.P.M.Z.W.S." would stand for : "Doctor of Medicine, Mathematics and Perpetual Motion at Weissenstein Castle"...
Brilliant Michel! The solution always seems obvious once you know, but I was struggling. Thank you.
DeleteJC
Nice!
DeleteOh! You code breakers!
ReplyDeleteIn stamp collecting we have a title for a certain form of it: "Fly-speck Philately".
This refers-to, obviously, those collectors who go wild over the teeniest itty-bitty thing that can be seen on specimens that is other-than the stamp graphic itself and, ofttimes, even the most minor of aberrations in that, that MIGHT have tangible meaning.
(Well, for example, such as in the 1923/24 First Royal Portrait photogravure issue of Egypt's, where all denominations showed random/consistent flaws due to gelatin surface damage. It is a whole specialty of Egyptian stamp collecting. The English firm of Harrison & Sons, Ltd. London, were responsible for these fine and endlessly fascinating issues. And just incidentally, any wishing to collect Egypt to-depth might be in touch with yours truly for specialty albums for same?)
Apparently, similar compulsions/fascinations in the Q-P-M field of research are at work there, as well.
Yes, a thing hidden deeply in Nature which is to be found "where others had looked" but had not.
So, WHICH is the code for that and, where and when found, how are they to be broken according to the two lines above as I have combined?
- James -
Yes, Fly-speck Apophenia, James! I like it.
DeleteThe code within the drawing above points to three pieces of information, in total. Two of them do not appear in any other drawings of Bessler's so are important.
JC
James wrote:
Delete"..."Fly-speck Philately".
This refers-to, obviously, those collectors who go wild over the teeniest itty-bitty thing that can be seen on specimens that is other-than the stamp graphic itself and, ofttimes, even the most minor of aberrations in that, that MIGHT have tangible meaning."
Lol! Yes, that's exactly the behavior that the aspiring to be successful reverse engineer of Bessler's wheels is forced to engage in! The danger, of course, it that as one learns more and more about less and less, he will, eventually, know everything about nothing! At some point, hyper-analysis must end and the plausible mechanics for Bessler's wheels must emerge. If not, then "all of one's industry will be in vain" as he might have put it.
And for all those in the USA, Happy Thanksgiving! Despite the problems in this world, most of us have much to be thankful for when we think about it.
Gee's John: apophenia!
DeleteA new one on me. Into the collection it goes. Thanks for it.
K.B., I am happy that you were amused. (Truly.)
". . . The danger, of course, it that as one learns more and more about less and less, he will, eventually, know everything about nothing! . . ." - K.B.
Yes, this would seem one, alright. Wise-words-all, no doubt.
Obviously, I've absolutely no mind for anything like 'the crypto,' and so must leave all of it's like to you experts that do. Physical objects and representations of such I can survey and derive useful information from with ease but, when it comes to hidden coding possibly hiding within the written, this just floors me. I admire those who can.
And from troublesome, tricky little me as well, a Happy Thanksgiving to all in the U.S.A. (and this especially to the Dextrals residing here.)
(I would expect that our dear English cousins just plug their ears when anything 'thanksgiving" is to be mentioned? - ha!)
- James -
Unraveling the symbolically encoded clues Bessler left us in the DT portraits is actually a subspecialty of its own and, imo, absolutely critical in order to reverse engineer his wheels. But, happily, once it's done, it's done for all time. I now believe I have completely decoded all of the relevant clues in both of the DT portraits. The current model I'm testing incorporates all of them. It will either be "it" or, once again, I've been led on a wild goose chase because I erroneous interpreted some of the clues left by Bessler. Something, however, tells me this time may, finally, thank God, be "it". I should know in a few more days.
ReplyDeleteNo, they don't celebrate "our" traditional Thanksgiving holiday in England, but I'm sure they have their equivalent holiday of giving thanks for what they have. Most countries do. The story of the Pilgrims who came to America in 1620 is absolutely amazing and I would urge anybody interested in how incredible luck can come along just in a nick of time to save an apparently hopeless situation to check it out.
For example, after spending their first harsh winter in the "New World" and losing about half of the 132 people on the "Mayflower" as a result, the Pilgrims were starting to talk about returning to England in March of 1621. But, by an incredible stroke of luck, before that return trip could take place, two Indians showed up at their settlement that just happened to speak English! These Indians showed them how to plant corn and various vegetables and as well as tricks for surviving in their harsh environment. As a result, the return trip was cancelled (the "Mayflower", however, did return in April / May with its captain and the surviving crew members) and the Pilgrims remained and went on to have an incredibly bountiful harvest. The two Indians also happened to know a big chief of several of the tribes in the area and helped the Pilgrims negotiate a peace treaty with him that lasted for fifty years. In November of 1621 the Pilgrims had a big banquet to celebrate their miraculous survival and give thanks to God for it. They even invited 90 Indians to the meal!
Well, K.B., I thought they did not but at least we all agree on Christmas - about the day even though it might be inaccurate ultimately.
ReplyDeleteBack in the Forties we used to have radio program on here, which featured a genius type of scholar that knew something of substance about everything. You remind me of him. You should have your own radio program, K.B.
Is there ANYTHING at all about which you know essentially nothing?
(Any attempted answer to this one would be very much like trying to prove a negative proposition.)
Written code guys!
- James -
James writes:
ReplyDelete"Is there ANYTHING at all about which you know essentially nothing?"
Haha...thanks for the compliment. Having a technical background, I tend to have opinions about a lot of things, but there are many subjects which I know nothing about and, most likely, never will. When I was younger, I had this fantasy that it was actually possible to have complete and perfect knowledge about the cosmos and all one had to do to achieve it was just keep reading and reading and reading. So I did. Eventually, I learned that, while this would certainly fill one's head with a lot of information, that information was always incomplete and, over time, would sort of deteriorate as it became obsolete or shown to be incorrect. Also, over time one will, from disuse, forget most of what little he did manage to absorb. The reality is that we live in a constantly changing world and the best one can hope for is to learn a few of the basic principles of science and life that seem to remain stable over time. Then one must decide what he considers of importance in life and try to use what he has learned to advance it as best he can. If he is very, very lucky, he might be able to uncover and announce new information which will also stand the test of time and be learned and used by others in the future. So, for me, the ideal life is one in which a person is born and after dying leaves the world a better place in some way. I think everyone actually wants this too, but probably does not articulate it as I have. The type of life I dread the most is the one that fulfills Da Vinci's pessimistic view of his fellow humans as being "merely machines for consuming food and producing waste." That type of life is anathema to me.
Update. Well, despite the nearly non-stop holiday celebration I got embroiled in, I did manage to do a little bit of Bessler research. I mentioned above that I had finally completely decoded the alphanumeric pm mechanism parameters hidden in the word "Zeugs" that is used in the first line of the second DT portrait. It is a major breakthrough for me because it confirms several of the parameter values found encoded in other parts of the portrait. Coincidence? Not likely. From this information, I have completed a wm2d model wheel which incorporates all of what I now believe are the correct values Bessler used. I have only been able to partially test this model, but, so far, its acceleration during the first 5 seconds of rotation through about 10 degrees is very smooth and robust. So far, I see no signs in the shape of the rpm vs. time graph that indicate it is going to "keel" like all of my previous 1400+ models did. Indeed, this could, at long, long last, finally be "it"! I should definitely know in a few more days when I see what happens to that curve as the wheel rotates through a complete segment of 45 degrees. If if passes that test successfully, I will immediately construct the 12 ft diameter wheel using the scaled up parameters and test that. If both the 3 ft table top model I'm now testing and the scaled up Merseberg sized wheel pass that test and are therefore "runners", then I will officially be declaring the Bessler wheel mystery to be solved!
42
DeleteYeah, brain the size of a planet...
DeleteK.B. I think it is important for us to acquire as much knowledge about as many subjects as is possible, and also to at least minimally master a small number of dissimilar disciplines say in art, mechanics, philosophy and ethics. Such is not concordant, I think, with the general consensus that specialization in some area is the key to success, because pleasing to Establishment corporatism, which practically demands of it.
DeleteGeneralization, doubtless-so, is helpfully good to entrepreneurs, whereas specialization certainly is to Big Biz. (And, for they that rule them, apparently is some measure of sociopathy.)
My guess is that you have BOTH NAILED!
Here? Still workin' on it.
(I think that the Cosmic Vault needs to be turned-on again, with loads of new materials added.)
- James -
To be a "Renaissance Man" with a dazzling breath and depth of knowledge is certainly something to strive for, but, ultimately it turns into a quest similar to someone who runs with all his might in an effort to reach the end of rainbow that touches the ground at which spot he expects to find a huge pot of glistening gold. Sounds good in principle, but becomes unachievable in practice. There was a time during the Middle Ages when one, after decades of study in a university, could finally earn his doctorate and legitimately claim he knew all there was to know. All that was, however, before the growth of modern science and technology. Nowadays, one can look forward to feeling omniscient for about, maybe, two weeks after receiving a Ph.D. He will then almost immediately begin to fall behind in his chosen specialty as research is published that he is not familiar with. Time marches on and it waits for no one...
DeleteAs far as my website is concerned, I have not added any material to it in years. I sort of lost interest in it when I got into authoring books which I much prefer...especially since they pay me a royalty! I really don't trust putting my research results on the web because I can't be assured that the material will not just disappear one day due to a company bankruptcy or a crashed server that had no backup. Otoh, my "Print On Demand" books never go out of print. If someone orders a copy a hundred years from now, they will get a freshly printed volume and not something that's been sitting on a bookstore shelf for decades while mold grew on it and dust mites nibbled away at its paper fibers.
It's the Ken Behrendt show again..zzzzzz.
ReplyDeleteFar more interesting than the Anon show. Zzzzzzzzzzzzz....
Delete